Maximizing yields
GETTING THE MOST OUT OF YOUR CORN HARVEST
this year’s hot summer combined with a lack of moisture could pose some interesting harvest challenges for growers. We could be harvesting drier-than-usual grain from a drought-stressed corn crop. One crop specialist has seen corn yield predictions across the province range from 50 to 180 bushels per acre.
With these crop conditions and varied yield predictions, it’s more important than ever to minimize harvest losses, says Morris Sagriff, Certified Crop Advisor and Pioneer agronomist. “No good crop just happens.” He encourages growers to scout their fields and tune-up their combines as harvest time approaches so they can plan to get the most out of every field they farm.
Crop scouting is the best tool pre-harvest to help plan for and minimize losses, he suggests. Pre-harvest losses are largely attributed to ears that drop off the stalk before harvest begins. To curb these losses, Sagriff believes timely harvest and hybrid selection are key. “Harvest losses will tend to increase the longer the crop is left in the field,” he says. “The best time to harvest will depend on an individual’s harvest and storage system.”
Sagriff encourages growers to scout fields as harvest approaches to see how the crop is holding up. He describes how you can use the “push” or “pinch” tests (see sidebar) to assess the strength of corn stalks for stalk rot, as well as how to sample for Gibberella ear rot (red or pink coloured mould that develops at the tip of the ear).
He says growers that record 20 percent or more stalk rot, or 20 percent Gibberella ear rot, will need to seriously weigh the cost of paying a bit more to dry the crop at a higher moisture level versus waiting for the crop to dry down in the field.
“For example, with severe stalk rot it may make more sense to harvest earlier at higher moisture and dry the grain than to risk a weather event like high winds coming through and blowing the crop over,” observes Sagriff.
Once you’ve made the decision to harvest, combine settings are a significant factor in preventing losses. “Finding your combine’s sweet spot will be a constant balancing act,” acknowledges Sagriff, though he points to three key areas that have big impacts.
combine settings
Header losses consist of whole ear or shelled kernel losses at the snapping rollers and stripper plates. Sagriff says this year, stressed ear shanks, drier grain and smaller cob sizes will, for the most part, require slower snapping roll speeds and narrower stripper plate settings to avoid cob shelling before entering the combine.
Cylinder losses consist of whole kernels that are still attached to pieces of cob and not shelled properly by the cylinder. With smaller, drought-stressed ears, Sagriff recommends that concave and rotor speeds be kept on the slower side, with tighter adjustments on clearance settings.
Separation losses consist of whole, shelled kernels being flung out the rear of the combine with husk leaves, stalks, silk and cob. With smaller kernels, and in some cases possible lighter test weights, Sagriff says tighter sieve and lower air fan settings may reduce kernels thrown out the back of the combine.
Sagriff encourages growers to monitor field losses every time they start a new field. Growers can cut a short distance into a field, get behind their machine and look on the ground. Every two kernels per square foot found lying on the ground equals one bushel per acre yield loss. If your combine is throwing excess grain – Sagriff says to assess stripper plate spacing, snapping roll speed and field ground speed. They all work together to determine how fast the plant is pulled down against the header.
Grain samples should be checked on every truckload for fines, cracks and excessive cob. “If there is excessive foreign material such as chewed up cobs or trash – open the concave, next slow the speed of the cylinder or rotor.”
Ultimately, Sagriff says it’s good to start with the settings for each particular combine. “Always start with your operator manual settings and then make adjustments accordingly; but never more than one at a time to allow proper assessment.”
GETTING HANDS ON WITH YOUR CORN CROP
Morris Sagriff, CCA, recommends some simple tests to assess your corn crop. For all tests, select five spots in the field that will serve as samples to represent the rest of the field.
To test for stalk rot, use either the Push or Pinch Test:
- PUSH each plant with an extended hand approximately 30 degrees from vertical – about the distance needed to touch tassel-to-tassel with plants in the next row. If the plant doesn’t snap back to vertical, it’s an indication of deterioration in the lower stalk. Do this for a minimum of 30 plants in each of the five areas.
- PINCH the lower section of the stalk on a minimum of 30 plants in each area (be sure to pinch the same spot on each plant), if the stalks crush easily between your fingers stalk rot has set in.
To test for an indication of Gibberella ear rot in corn:
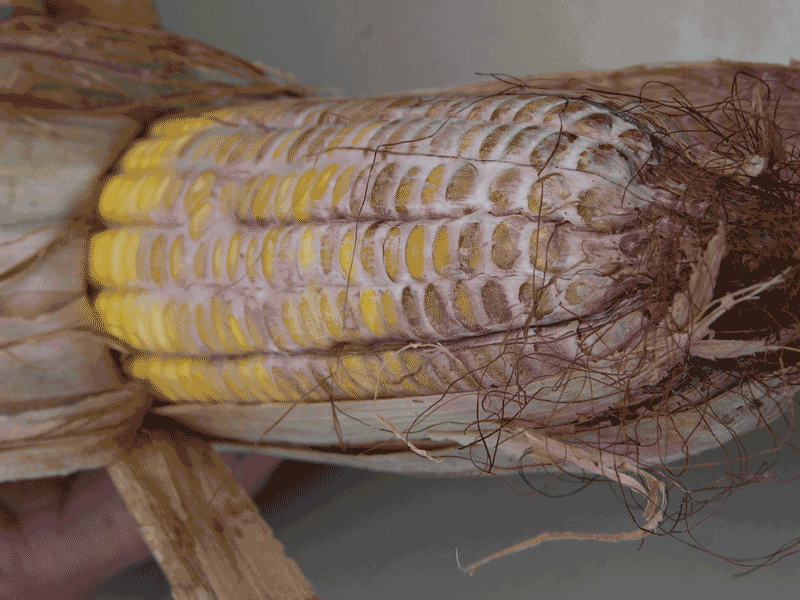
- Walk zig-zag patterns in your five sample areas and strip down 30 husks and look for a distinctive white, cottony growth or pink mould. If seeing none, take your inspection a step further and gently shell the kernels of the top one-third of the ear. Inspect the lower half of the kernels for mould and the cob for any darkened red dog. •


